ADA Voting Unit Logic & Accuracy Testing
Summary
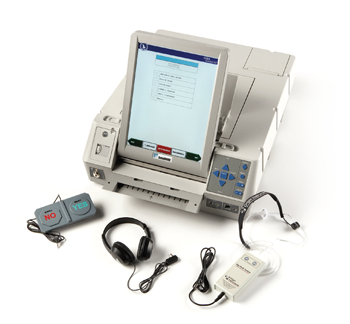
At least one ADA Voting Unit must be available in every polling location during an election. The Cuyahoga County Board of Elections deploys the ES&S AutoMARK unit (pictured at right) to more than 400 polling locations before each countywide election. Bipartisan testing teams will ensure the audio is working on each unit and test mark every oval position on the ballot from each precinct assigned to that unit. Since ADA Voting Units do not scan ballots, no upload and verification process is necessary for L&A testing. However, when testing is complete, the units must be secured for delivery to the polling location.
Materials Needed:
- Blank ballots
- L&A Checklists
- Extra ink cartridges for ADA units
- Memory cards
- Handwritten Equipment Maintenance Logs
- Green pens
- Team labels
- Envelopes
Set Up Procedures
Before testing of the ADA Voting Units can begin, the units must be taken out of their cases and staged on tables.
 Place the unit onto the table and plug it in to the surge protector.
- Remove the headphones from the case and plug them into the unit.
- Insert memory card with the election definition into the unit.
- Position the screen and the ballot input tray so that the unit is ready to be used.
- Turn the voting unit on and verify that the battery is charging.
 On each unit, place at least one ballot for each precinct designated for that unit’s polling location.
- Place an L&A checklist on each unit.
Testing Procedures
Bipartisan teams are responsible for conducting the L&A test on each ADA Voting Unit. The testing teams should use a checklist based on the instructions listed below.
- Turn the key to the “On” position and verify the “Please insert your ballot” message appears on the screen.
- Insert a test ballot into the unit. Screen will show “Select a language”. Press the “English” button. The ballot will load to the “Voting Instructions” screen.
- To test the audio you must increase the volume. Listen to ensure the audio begins to play. Also test the following buttons on the front panel of the unit to ensure they are working properly: (1) back (2) forward (3) up (4) down (5) tempo and (6) repeat. You do not have to listen to the entire ballot as audio proofing has been completed. Complete this button test only on the first ballot.
- Once you are sure the audio is working, eject the ballot.
- Turn the key to the “Test” position. Check the date and time using the “Set date/time” button and correct if necessary.
- Press the “Test ballot print” button and place a check mark in the “Enable calibration suggestions” box.
- Insert a test ballot into the unit. The screen will read “Printing ballot style” followed by the city, ward, and precinct.
- Once the screen shows “Printing complete”, eject the ballot. A “Printer Calibration” box may appear on the screen asking “Would you like to re-calibrate the printer using these settings?” Always select ‘Yes”. Verify all ovals have been marked properly (ink within all ovals, ink is dark, and the correct name or response is printed at each position). If any ballot ovals or names are not marked correctly, check for improvement as the next two or three ballots are printed. If no improvement is noted, the ink cartridge must be replaced.
- To replace the cartridge, open the rear access door of the unit. After a new cartridge is inserted, press the “Service print cartridge” button and select “Yes”.
- After changing the ink cartridge and inserting a new blank ballot, if ballot is still not marked properly, the unit has FAILED testing.
- Continue the “Test ballot print” for each remaining test ballot, again checking the proper marking of each ballot.
- After all test ballots are printed and verified, fill in the appropriate box on the checklist to indicate if the unit passed or failed this test.
- Check tamper tape seal on ink cartridge door. Replace if necessary.
- Turn the key to the “Off” position, close the lid, and place all test ballots and the checklist on top of the AutoMARK.
Attached below is the ADA Voting Unit L&A checklist used by the Cuyahoga County Board of Elections.
Machine Failures
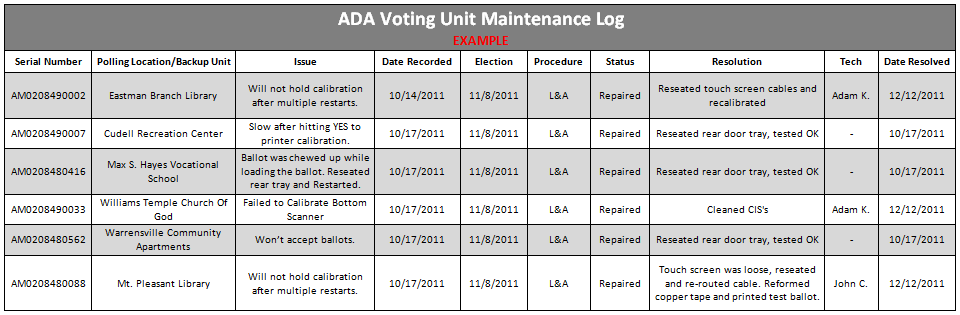
If any ADA Voting Unit fails L&A testing, it must be reported to a supervisor. All details regarding machine failures should be documented using the Handwritten Equipment Maintenance Logs provided below.
![]() Handwritten Equipment Maintenance Logs
Handwritten Equipment Maintenance Logs
Upon encountering a machine failure, management or a supervisor should determine whether the unit requires adjustment or replacement. If it is to be replaced, transfer the memory card and unit labels to a new unit.
Throughout testing, supervisors should keep the managers up-to-date with the number and type of machine failures. When L&A testing has concluded, a detailed machine failure spreadsheet for the election should be created using the Equipment Maintenance Log Blank Spreadsheet provided below as a template.
![]() Equipment Maintenance Log Blank Spreadsheet
Equipment Maintenance Log Blank Spreadsheet
Charging the ADA Voting Unit
Following the Logic & Accuracy test on each unit, the unit must remain plugged in. This ensures the unit will have a full charge when deployed for the election.
Tear Down
All units must be taken down, sealed and prepared for the election. Seals must be placed on all doors, compartments, and other areas that are accessible to tampering. Staff must print and sign their name and include the date at the bottom of each checklist provided.